API Access and Token Introspection with OpenId Connect in ZITADEL

Developer Advocate
- 1. Introduction
- 2. Supported Grant Types/Flows for Introspection and API Access in ZITADEL
- 3. How APIs Access the ZITADEL Introspection Endpoint
- 4. How Service Users Can Obtain Access Tokens
- 5. A Note on Enhanced Safety and Security
- 6. Closing Remarks
1. Introduction
In Secure Logins and Resource Access with ZITADEL and OpenID Connect - Part 1, we established that although APIs can be broadly viewed as a type of application, they aren't typically classified as an application type within the OpenID Connect context. While APIs are vital for communication between applications and services, they don't directly participate in user authentication. Instead, they often authorize client requests based on access tokens issued by an authorization server. We explored how these APIs use grant types like JWT Profile or Basic Authentication to access the authorization server's introspection endpoint for token validation.
We also examined APIs or systems that function as clients, requiring access to other protected APIs to perform specific tasks without accessing resources on behalf of end users. These client APIs or systems can obtain access tokens from an authorization server to access protected APIs.
In this post, we'll demonstrate how to secure APIs and access protected APIs as a back-end application using ZITADEL, offering a streamlined approach to API security.
2. Supported Grant Types/Flows for Introspection and API Access in ZITADEL
2.1 API Applications
Protected APIs utilize the ZITADEL introspection endpoint to verify the validity of provided tokens. If your API serves as an OAuth resource server (that can be accessed by user-facing or back-end applications) and needs to validate access tokens by calling the ZITADEL introspection API, you can register this API in ZITADEL using one of the following two methods:
- JSON Web Token (JWT) Profile (Recommended)
- Follow this tutorial to learn how to register an API application using JWT Profile with ZITADEL
- Basic Authentication
- Follow this tutorial to learn how to register an API application using Basic Authentication with ZITADEL.
2.2 Service Users
API clients (e.g., APIs, CLIs, or other back-end apps) call the token endpoint to obtain a Bearer token before attempting to access protected APIs. If client APIs or systems need to access other protected APIs, they must be declared as service users. Note that service users are not considered application types in ZITADEL. The following mechanisms are available for service users to obtain access tokens:
- JSON Web Token (JWT) Profile (Recommended)
- Follow this tutorial to learn how to call a protected API using JWT Profile with ZITADEL
- Client Credentials
- Follow this tutorial to learn how to register an API application using Client Credentials with ZITADEL:
- Personal Access Tokens (PAT)
- Follow this tutorial to learn how to register an API application using a Personal Access Token with ZITADEL.
2.3 Possible Combinations of API Access Flows and Introspection Flows
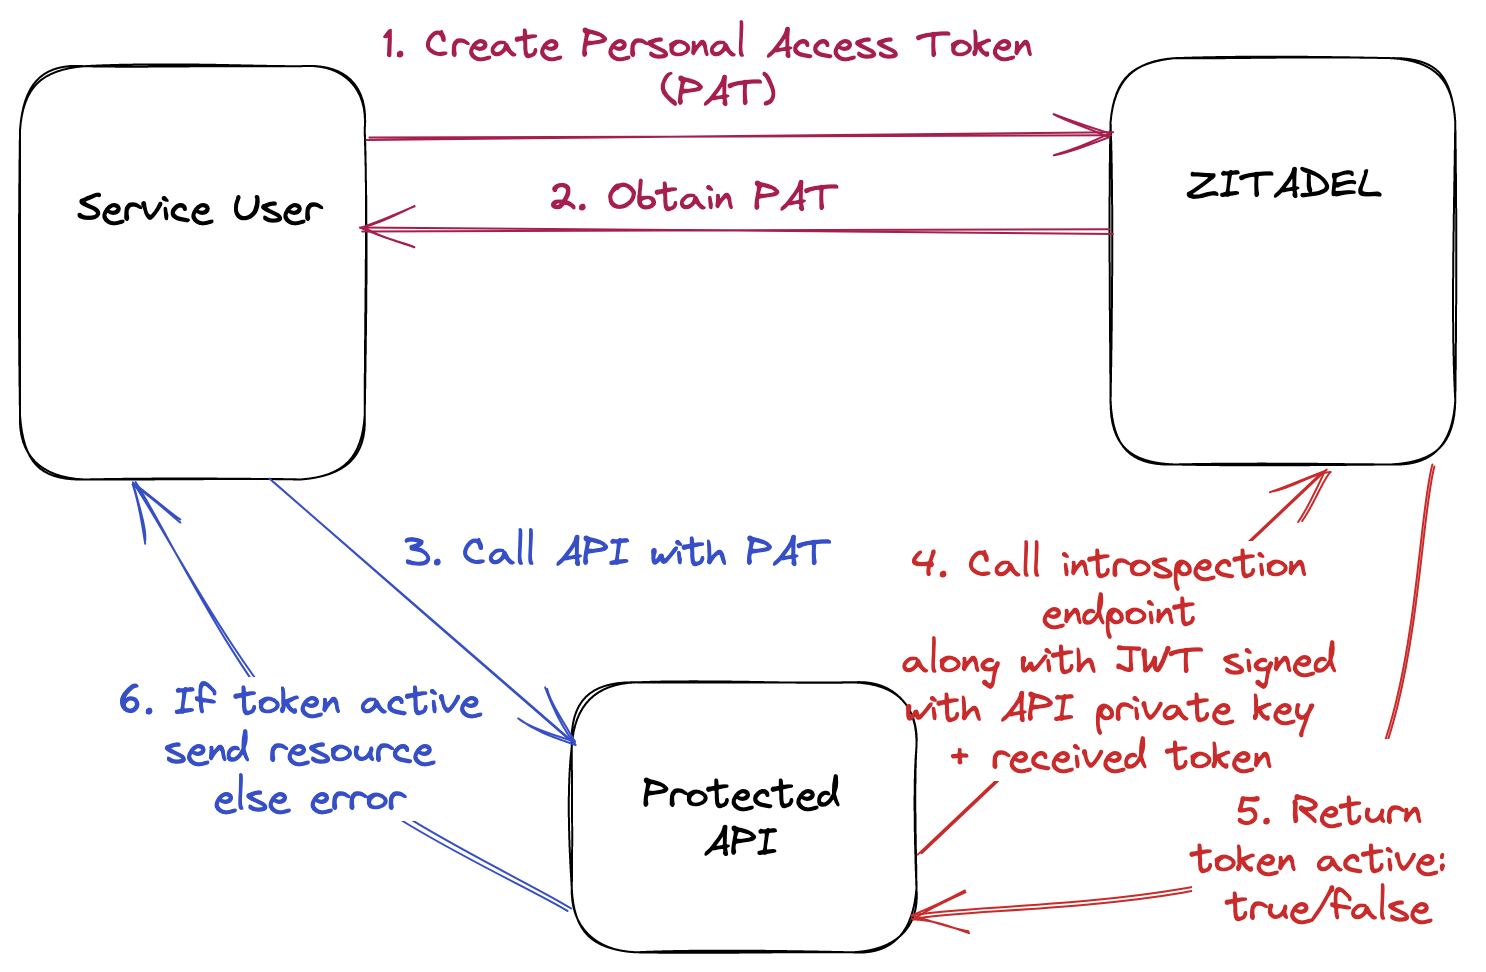
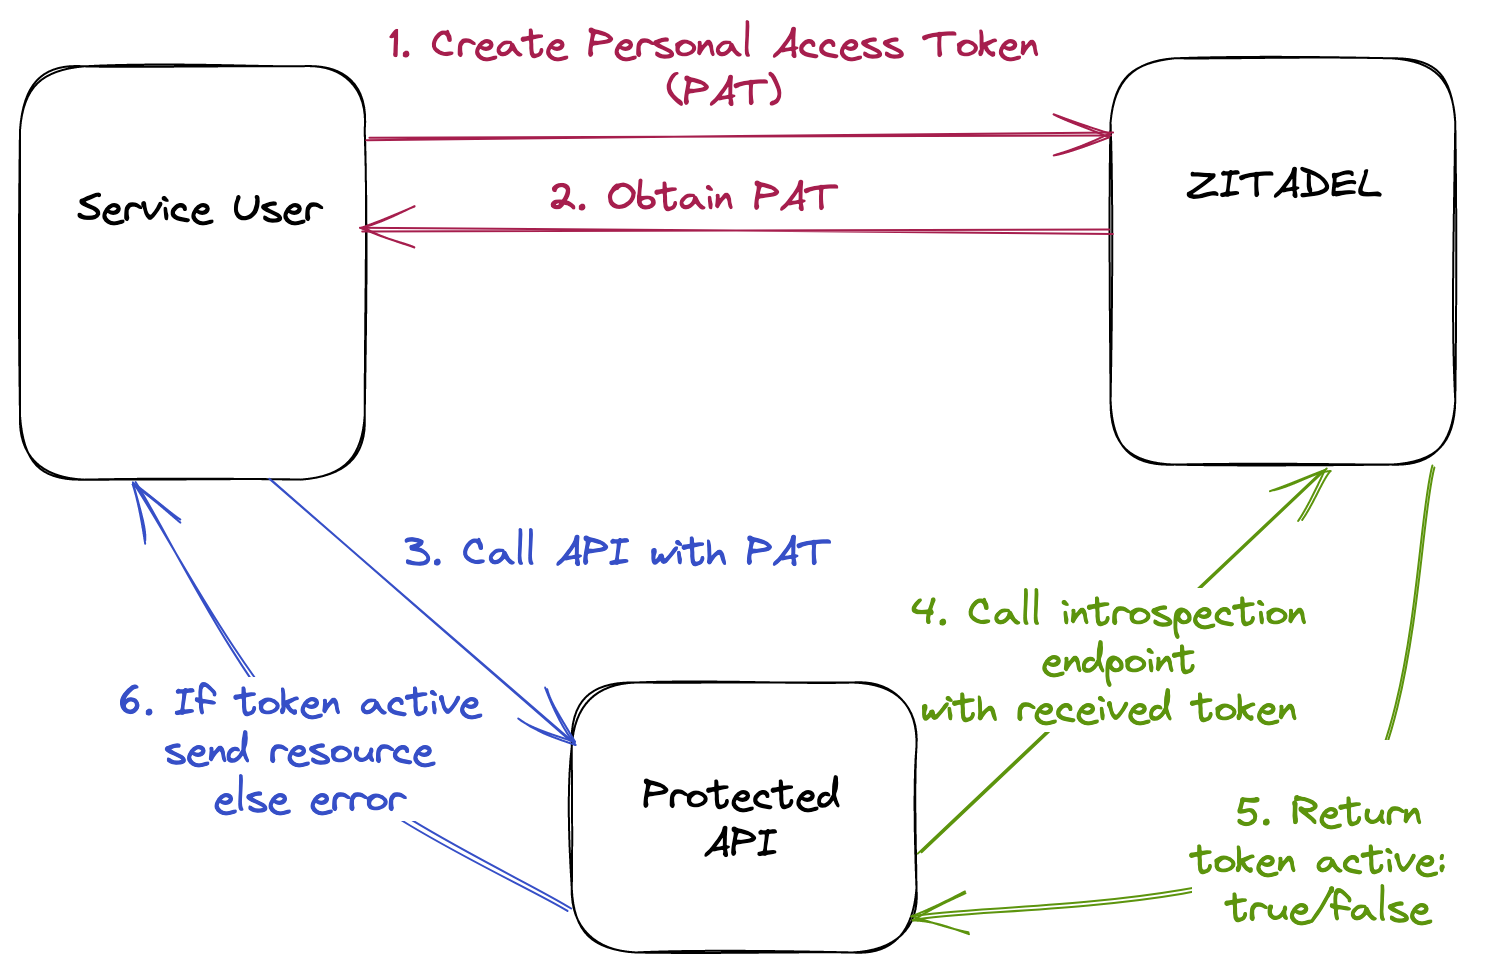
You can protect and access APIs using the below approaches with ZITADEL. All possible combinations are outlined in the diagrams below. They are named based on the grant/token type used by the service user and grant type used by the API.
JWT Profile - JWT Profile
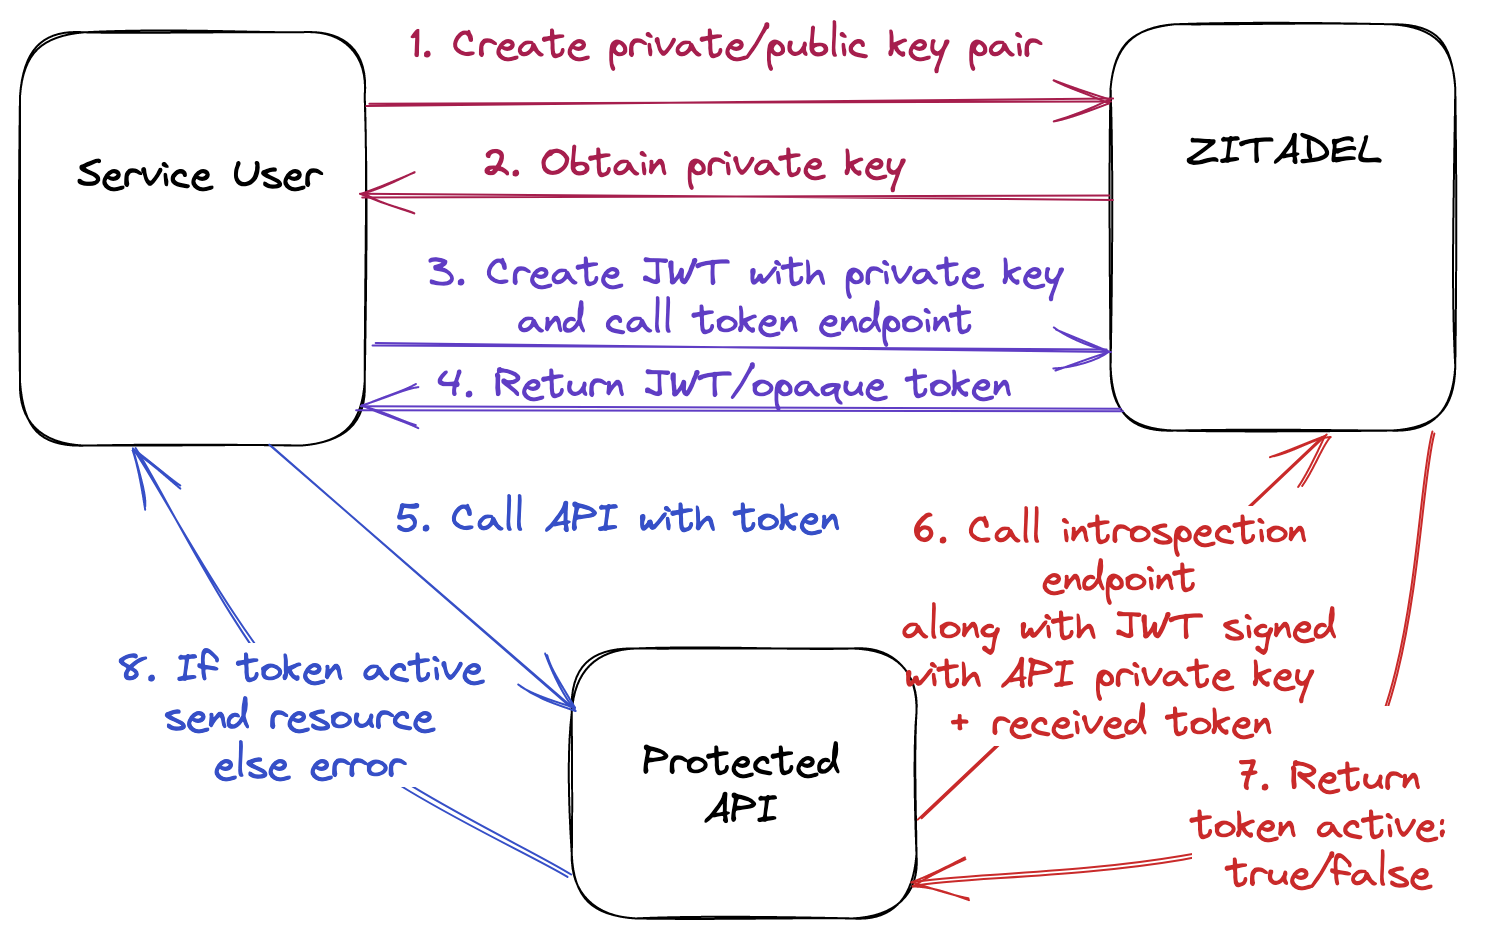
JWT Profile - Basic Authentication
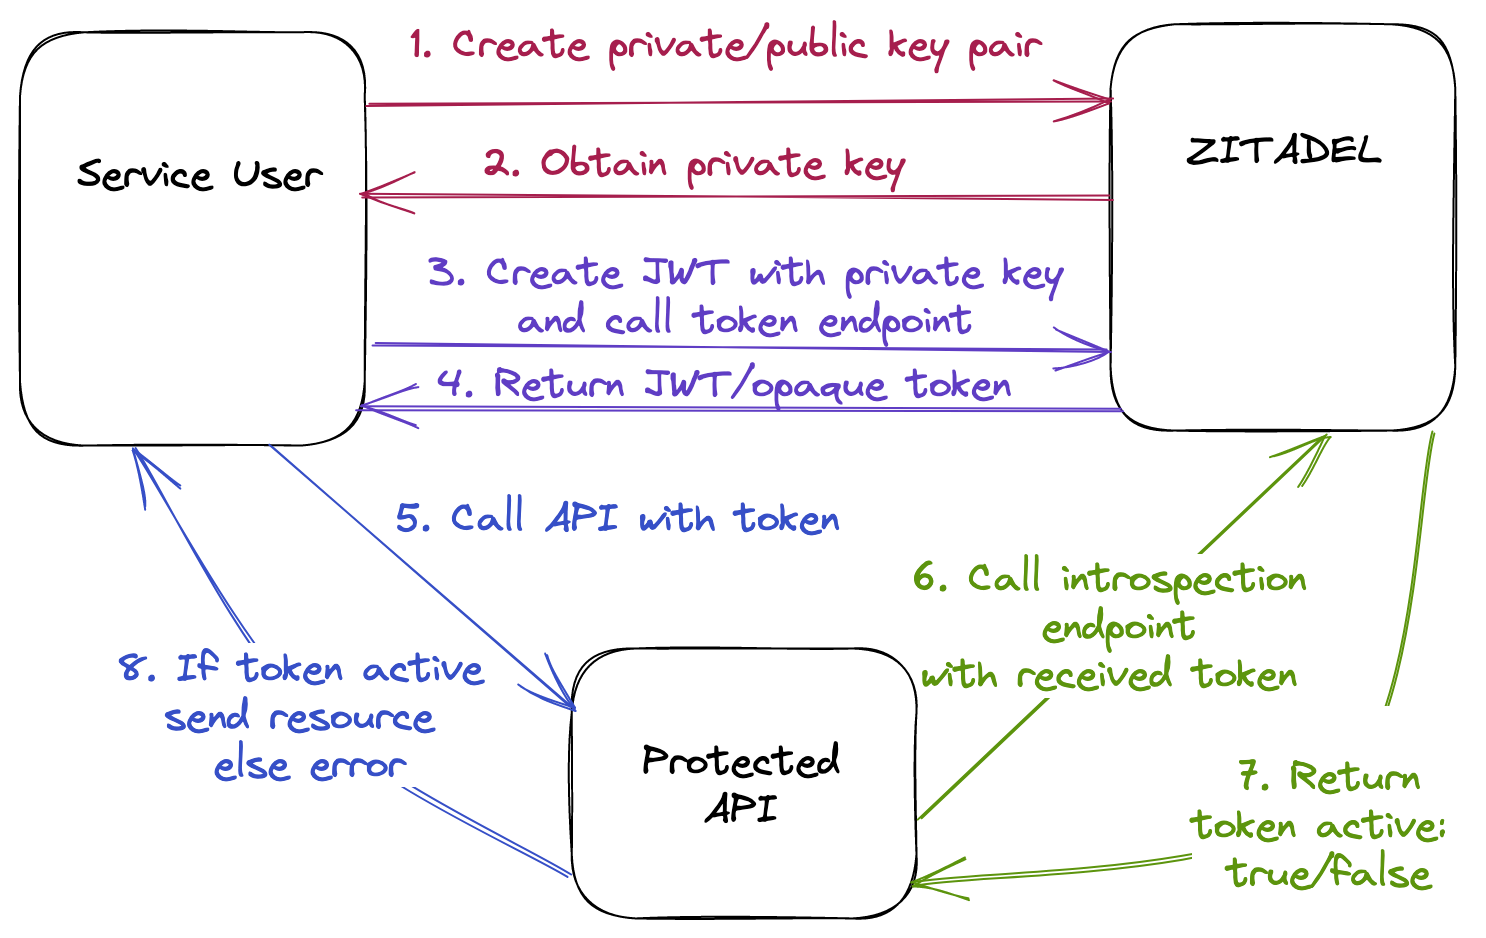
Client Credentials - JWT Profile
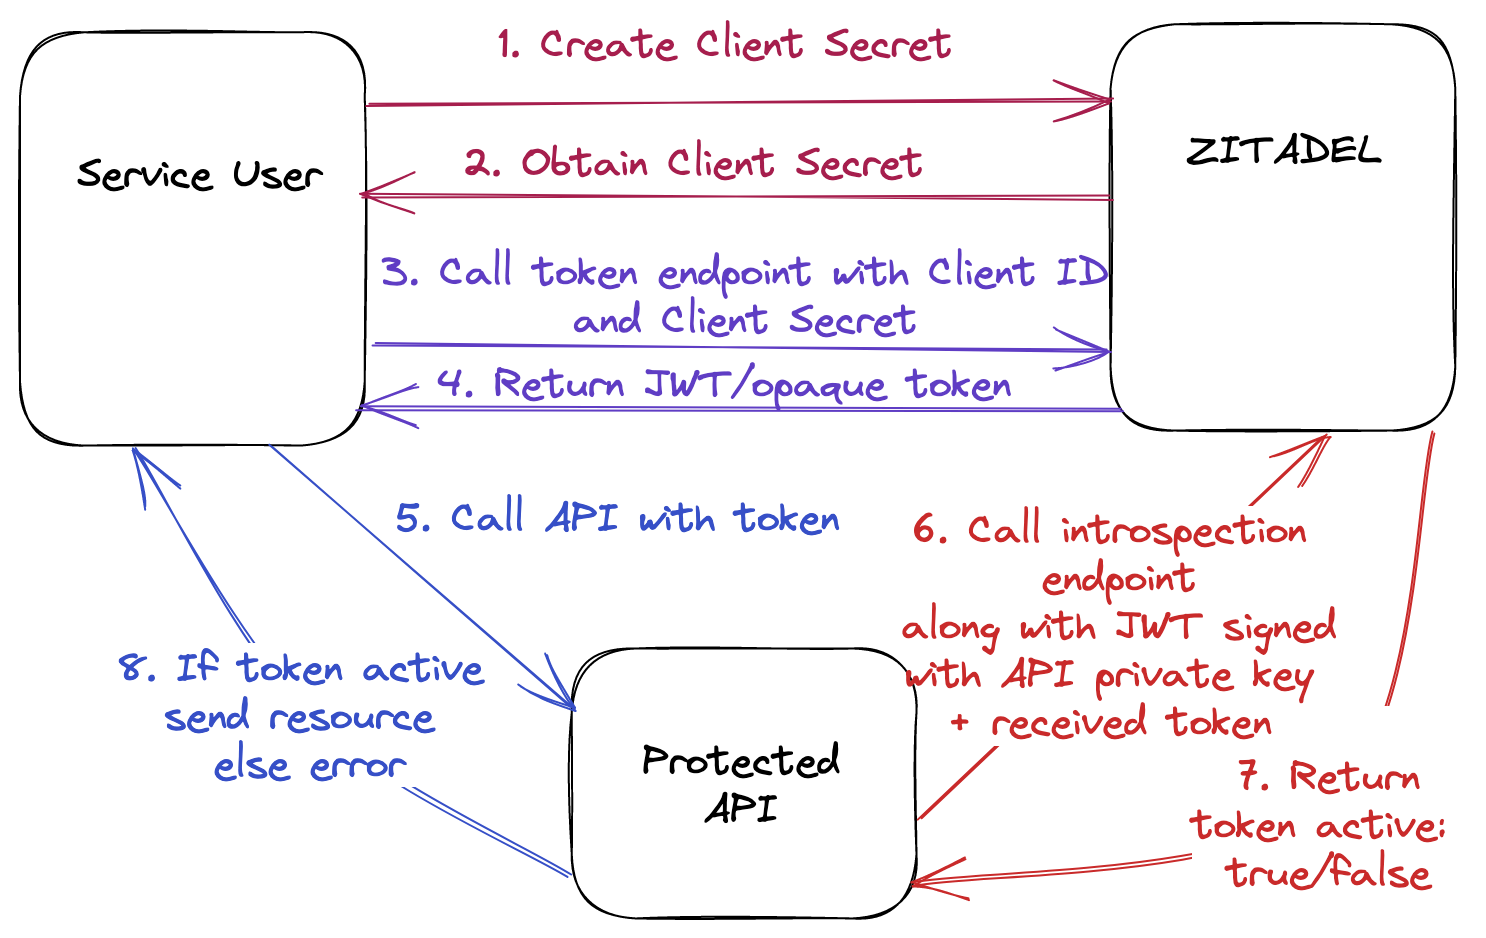
Client Credentials - Basic Authentication
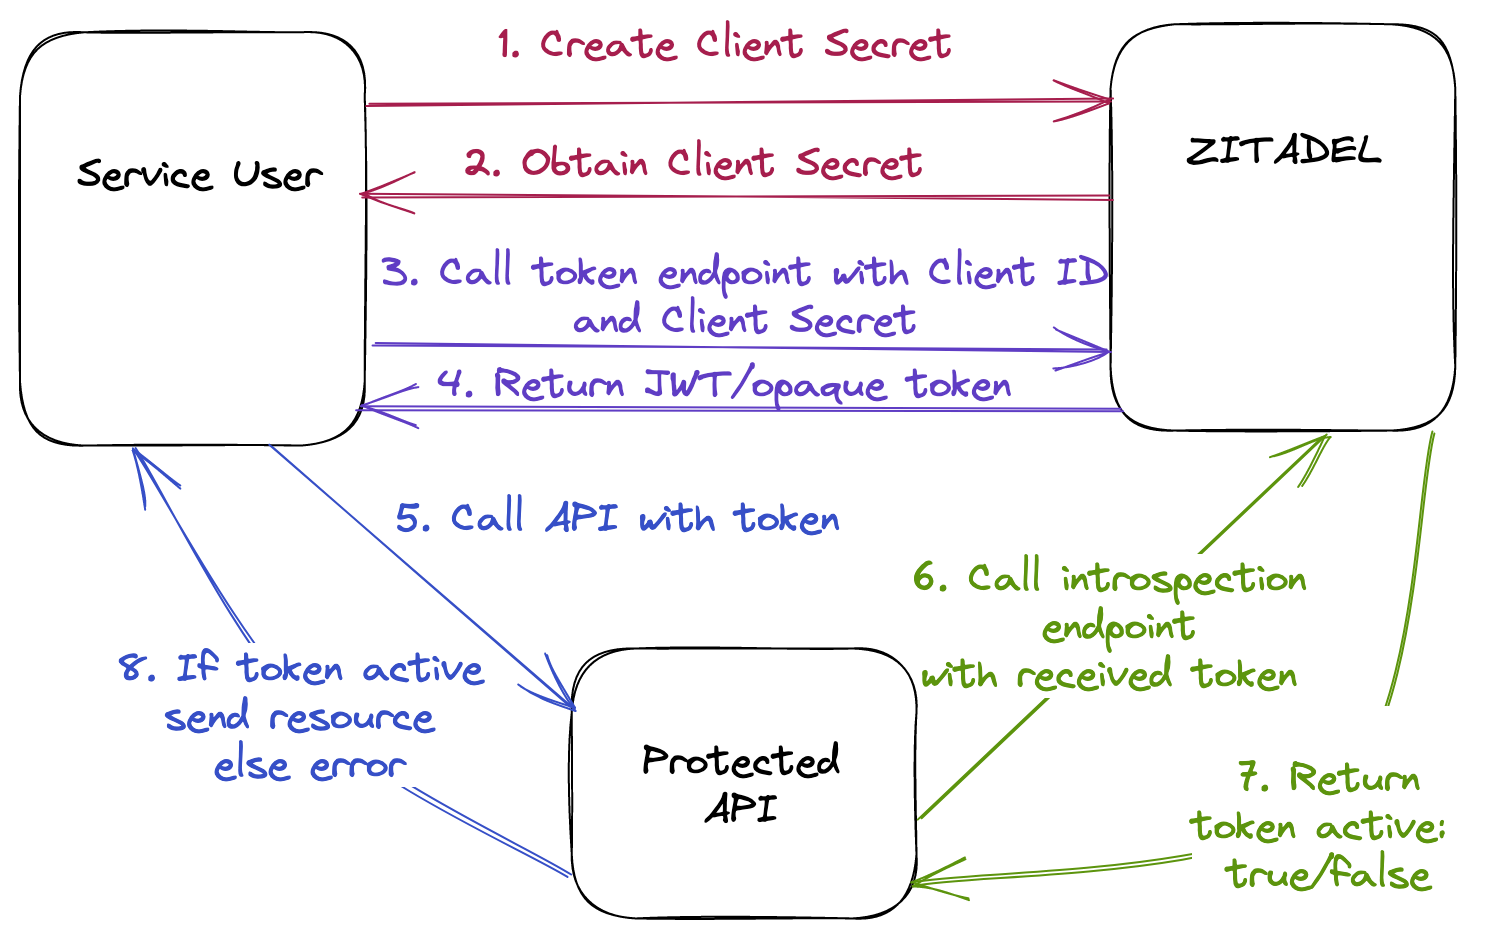
Personal Access Token - JWT Profile
Personal Access Token - Basic Authentication
3. How APIs Access the ZITADEL Introspection Endpoint
As previously mentioned, two methods exist for invoking the introspection endpoint: JWT Profile and Basic Authentication. It's crucial to understand that the API is entirely separate from the front end. The API shouldn’t concern itself with the token type received. Instead, it's about how the API chooses to call the introspection endpoint, either through JWT Profile or Basic Authentication. Many APIs assume they might receive a JWT and attempt to verify it based on signature or expiration. However, with ZITADEL, you can send either a JWT or an opaque Bearer token from the client end to the API. This flexibility is one of ZITADEL's standout features.
The Introspection Endpoint - {your_domain}/oauth/v2/introspect
This endpoint enables clients to validate an access_token, either opaque or JWT. Unlike client-side JWT validation, this endpoint checks if the token has not been revoked (by the client or logout).
| Parameter | Description |
|---|---|
token | The access token to be introspected. |
Depending on your authorization method, you will need to provide additional parameters or headers. We recommend the JWT Profile for enhanced security.
3.1 JWT Profile
You must send a client_assertion as a JWT signed with the API’s private key for ZITADEL to validate the signature against the registered public key.
Request Parameters:
| Parameter | Description |
|---|---|
client_assertion | When using JWT profile for token or introspection endpoints, you must provide a JWT as an assertion generated with the structure shown below and signed with the downloaded key. |
client_assertion_type | urn:ietf:params:oauth:client-assertion-type:jwt-bearer |
The downloaded key for the API will have the following format:
{
   "type": "application",
   "keyId": "81693565968962154",
   "key": "-----BEGIN RSA PRIVATE KEY-----...-----END RSA PRIVATE KEY-----",
   "clientId": "78366401571920522@acme",
   "appId": "78366403256846242"
}
You must create your client assertion JWT with the following format:
Header:
{
   "alg": "RS256",
   "kid": "81693565968962154" (keyId from your key file)
}
Payload:
{
   "iss": "78366401571920522@acme", (clientId from your key file)
   "sub": "78366401571920522@acme", (clientId from your key file)
   "aud": "https://{your_domain}", (your ZITADEL domain/issuer URL)
   "exp": 1605183582, (Unix timestamp of the expiry)
   "iat": 1605179982   (Unix timestamp of the creation signing time of the JWT, MUST NOT be older than 1h)
}
Create the JSON Web Token with the above header and payload, and sign it with the private key in your key file. You can do this programmatically or use tools like https://github.com/zitadel/zitadel-tools and https://dinochiesa.github.io/jwt/.
The request from the API to the introspection endpoint should be in the following format:
curl --request POST \
 --url {your_domain}/oauth/v2/introspect \
 --header 'Content-Type: application/x-www-form-urlencoded' \
 --data client_assertion_type=urn:ietf:params:oauth:client-assertion-type:jwt-bearer \
 --data client_assertion=eyJhbGciOiJSUzI1Ni... \
 --data token=VjVxyCZmRmWYqd3_F5db9Pb9mHR
Here's an example of how this is done in Python code:
def introspect_token(self, token_string):
    #Create JWT for client assertion
    payload = {
        "iss": API_PRIVATE_KEY_FILE["client_id"],
        "sub": API_PRIVATE_KEY_FILE["client_id"],
        "aud": ZITADEL_DOMAIN,
        "exp": int(time.time()) + 60 * 60,  # Expires in 1 hour
        "iat": int(time.time())
    }
    headers = {
        "alg": "RS256",
        "kid": API_PRIVATE_KEY_FILE["key_id"]
    }
    jwt_token = jwt.encode(payload, API_PRIVATE_KEY_FILE["private_key"], algorithm="RS256", headers=headers)

    #Send introspection request
    headers = {"Content-Type": "application/x-www-form-urlencoded"}
    data = {
        "client_assertion_type": "urn:ietf:params:oauth:client-assertion-type:jwt-bearer",
        "client_assertion": jwt_token,
        "token": token_string
    }
    response = requests.post(ZITADEL_INTROSPECTION_URL, headers=headers, data=data)
    response.raise_for_status()
    token_data = response.json()
    print(f"Token data from introspection: {token_data}")
    return token_data
See the full code and instructions here.
3.2 Basic Authentication
With Basic Authentication, you will receive a Client ID and Client Secret for your API. Send your client_id and client_secret as a Basic Auth Header in the following format:
Authorization: "Basic " + base64( formUrlEncode(client_id) + ":" + formUrlEncode(client_secret) )
The request from the API to the introspection endpoint should be in the following format:
curl --request POST \
 --url \{your_domain\}/oauth/v2/introspect \
 --header 'Content-Type: application/x-www-form-urlencoded' \
 --header 'Authorization: Basic {your_basic_auth_header}' \
 --data token=VjVxyCZmRmWYqd3_F5db9Pb9mHR5fqzhn...
Here's an example of how this is done in Python code:
def introspect_token(self, token_string):
    url = ZITADEL_INTROSPECTION_URL
    data = {'token': token_string, 'token_type_hint': 'access_token', 'scope': 'openid'}
    auth = HTTPBasicAuth(API_CLIENT_ID, API_CLIENT_SECRET)
    resp = requests.post(url, data=data, auth=auth)
    resp.raise_for_status()
    return resp.json()
See the full code and instructions here.
3.3 Introspection Response
Upon successful introspection, regardless of the token type or introspection method, a response with the boolean active is returned, indicating if the provided token is active and if the requesting client is part of the token audience. If active is true, further information will be provided:
| Property | Description |
|---|---|
aud | The audience of the token |
client_id | The client_id of the application the token was issued to |
exp | Time the token expires (as unix time) |
iat | Time the token was issued at (as unix time) |
iss | Issuer of the token |
jti | Unique id of the token |
nbf | Time the token must not be used before (as unix time) |
scope | Space delimited list of scopes granted to the token |
token_type | Type of the inspected token. Value is always Bearer |
username | ZITADEL's login name of the user. Consists of username@primarydomain |
Depending on the granted scopes, additional information about the authorized user is provided.
If the authorization fails, an HTTP 401 with invalid_client will be returned.
In summary, the introspection endpoint plays a crucial role in validating access tokens, either opaque or JWT, ensuring that they are not revoked.
4. How Service Users Can Obtain Access Tokens
4.1 Obtaining an Access Token via the ZITADEL Token Endpoint
The Token Endpoint - {your_domain}/oauth/v2/token
The Token API returns various tokens (access, ID, and refresh) based on the grant type used. The main distinction between human and machine/service users is the authentication credentials type. Humans log in via a prompt, while machines need a non-interactive process. We recommend the JWT Profile for machine-to-machine clients (also known as service users in ZITADEL) for enhanced security.
4.1.1 JWT Profile
Send a JWT containing standard claims for access tokens, signed with your private key, to the token endpoint. Provide a client assertion as JWT to ZITADEL to validate the signature against the registered public key.
Request Parameters:
| Parameter | Description |
|---|---|
grant_type | urn:ietf:params:oauth:grant-type:jwt-bearer |
assertion | JWT containing the claims for the access token |
scope | Scopes you would like to request from ZITADEL. Scopes are space delimited, e.g. openid profile urn:zitadel:iam:org:project:id:{your_projectid}:aud read:messages |
Here’s how you can create the client assertion:
The downloaded key for the service user will have the following format:
{
   "type": "serviceaccount",
   "keyId": "23243445345345344453",
   "key": "-----BEGIN RSA PRIVATE KEY-----...-----END RSA PRIVATE KEY-----",
   "userId": "78366403256846242"
}
You must create your assertion JWT with the following format: Header:
{
   "alg": "RS256",
   "kid": "81693565968962154" (keyId from your key file)
}
Payload:
{
   "iss": "78366401571920522@acme", (userId from your key file)
   "sub": "78366401571920522@acme", (userId from your key file)
   "aud": "https://\{your_domain\}", (your ZITADEL domain/issuer URL)
   "exp": 1605183582, (Unix timestamp of the expiry)
   "iat": 1605179982   (Unix timestamp of the creation signing time of the JWT, MUST NOT be older than 1h)
}
Create the JSON Web Token with the above header and payload, and sign it with the private key in your key file. You can do this programmatically or use tools like https://github.com/zitadel/zitadel-tools and https://dinochiesa.github.io/jwt/.
The request from the service user to the token endpoint should be in the following format (use scopes according to your use case):
curl --request POST \
  --url https://your_zitadel_domain/oauth/v2/token \
  --header 'Content-Type: application/x-www-form-urlencoded' \
  --data grant_type=urn:ietf:params:oauth:grant-type:jwt-bearer \
  --data assertion=your_jwt_token
  --data scope='openid profile email urn:zitadel:iam:org:project:id:your_project_id:aud read:messages \
Here's an example of how this is done in Python code:
import json
import time
import requests
import jwt
import os
from dotenv import load_dotenv

load_dotenv()

ZITADEL_DOMAIN = os.getenv("ZITADEL_DOMAIN")
CLIENT_PRIVATE_KEY_FILE_PATH = os.getenv("CLIENT_PRIVATE_KEY_FILE_PATH")
ZITADEL_TOKEN_URL = os.getenv("ZITADEL_TOKEN_URL")
PROJECT_ID = os.getenv("PROJECT_ID")

#Load the downloaded JSON file
with open(CLIENT_PRIVATE_KEY_FILE_PATH, "r") as f:
    json_data = json.load(f)

private_key = json_data["key"]
kid = json_data["keyId"]
user_id = json_data["userId"]

#Create JWT header and payload
header = {
    "alg": "RS256",
    "kid": kid
}

payload = {
    "iss": user_id,
    "sub": user_id,
    "aud": ZITADEL_DOMAIN,
    "iat": int(time.time()),
    "exp": int(time.time()) + 3600
}

#Sign the JWT
jwt_token = jwt.encode(payload, private_key, algorithm='RS256', headers=header)

#Request an OAuth token from ZITADEL
data = {
    "grant_type": "urn:ietf:params:oauth:grant-type:jwt-bearer",
    "scope": f"openid profile email urn:zitadel:iam:org:project:id:{PROJECT_ID}:aud read:messages",
    "assertion": jwt_token
}

response = requests.post(ZITADEL_TOKEN_URL, data=data)

if response.status_code == 200:
    access_token = response.json()["access_token"]
    print(f"Response: {response.json()}")
    print(f"Access token: {access_token}")
else:
    print(f"Error: {response.status_code} - {response.text}")
See the instructions to configure JWT Profile for a service user and run the code here.
4.1.2 Client Credentials
You can obtain a Client ID and a Client Secret for your service user and use one of the following ways to obtain a token from the ZITADEL token endpoint.
Option 1:
Request Parameters:
| Parameter | Description |
|---|---|
grant_type | client_credentials |
scope | Scopes you would like to request from ZITADEL. Scopes are space delimited, e.g. openid profile urn:zitadel:iam:org:project:id:{your_projectid}:aud read:messages |
You need to authenticate your client by either sending client_id and client_secret as Basic Auth Header. See Client Secret Basic Auth Method on how to build it correctly.
curl --request POST \
 --url \{your_domain\}/oauth/v2/token \
 --header 'Content-Type: application/x-www-form-urlencoded' \
 --header 'Authorization: Basic ${BASIC_AUTH}' \
 --data grant_type=client_credentials \
 --data scope=openid profile
Option 2
Or you can also send your client_id and client_secret as parameters in the body:
| Parameter | Description |
|---|---|
client_id | client_id of the application |
client_secret | client_secret of the application |
curl --request POST \
 --url \{your_domain\}/oauth/v2/token \
 --header 'Content-Type: application/x-www-form-urlencoded' \
 --data grant_type=client_credentials \
 --data client_id=${CLIENT_ID} \
 --data client_secret=${CLIENT_SECRET} \
 --data scope=openid profile
Successful Response:
| Property | Description |
|---|---|
access_token | An access_token as JWT or opaque token |
expires_in | Number of seconds until the expiration of the access_token |
token_type | Type of the access_token. The value is always Bearer |
Here’s an example response:
HTTP/1.1 200 OK
Content-Type: application/json

{
 "access_token": "MtjHodGy4zxKylDOhg6kW90WeEQs2q...",
 "token_type": "Bearer",
 "expires_in": 43199
}
Here’s how you can invoke the token endpoint with client credentials with Python:
import os
import requests
import base64
from dotenv import load_dotenv

load_dotenv()

ZITADEL_DOMAIN = os.getenv("ZITADEL_DOMAIN")
CLIENT_ID = os.getenv("CLIENT_ID")
CLIENT_SECRET = os.getenv("CLIENT_SECRET")
ZITADEL_TOKEN_URL = os.getenv("ZITADEL_TOKEN_URL")
PROJECT_ID = os.getenv("PROJECT_ID")

#Encode the Client ID and Client Secret in Base64
client_credentials = f"{CLIENT_ID}:{CLIENT_SECRET}".encode("utf-8")
base64_client_credentials = base64.b64encode(client_credentials).decode("utf-8")

#Request an OAuth token from ZITADEL
headers = {
    "Content-Type": "application/x-www-form-urlencoded",
    "Authorization": f"Basic {base64_client_credentials}"
}

data = {
    "grant_type": "client_credentials",
    "scope": f"openid profile email urn:zitadel:iam:org:project:id:{PROJECT_ID}:aud read:messages"

}

response = requests.post(ZITADEL_TOKEN_URL, headers=headers, data=data)

if response.status_code == 200:
    access_token = response.json()["access_token"]
    print(f"Response: {response.json()}")
    print(f"Access token: {access_token}")
else:
    print(f"Error: {response.status_code} - {response.text}")
See instructions to configure client credentials for a service user and run the code here.
4.2 Personal Access Token (PAT)
A service user can generate a Personal Access Token (PAT), which is a ready-to-use token. Because the PAT is a ready-to-use Token, you do not need to call the Token Endpoint and you can add it as an Authorization Header and send it in your requests to the protected API directly.
See instructions to configure a PAT for a service user and invoke a protected API with the PAT here.
5. A Note on Enhanced Safety and Security
In terms of security, client secrets/API tokens and JWTs used for authentication present certain weaknesses. Client secrets/API tokens have been considered less secure over time because they rely on being hidden, and their use cannot always be fully controlled or prevented from being leaked.
However, JWTs used for authentication provide a more secure alternative. They are signed with a secret key, ensuring that their contents cannot be tampered with, and can also be limited in their time of use through an expiration claim. This makes JWTs less likely to be exposed, as long as the signing key remains confidential. Furthermore, JWTs can be encrypted for additional security if required. Overall, for use cases that demand higher levels of security, using JWTs for authentication is recommended due to their enhanced security features and expiration capability.
6. Closing Remarks
In this post, we delved into the intricacies of API access and introspection using OpenID Connect in the context of ZITADEL. We started by understanding the unique position APIs hold within the OpenID Connect framework and how they rely on access tokens for authorization. We then explored various grant types and token validation mechanisms for securing APIs.
As API-driven architectures continue to gain traction, understanding the fundamentals of API security and leveraging an identity and access management solution like ZITADEL becomes increasingly crucial to safeguard your digital assets and maintain a secure environment for your users and clients.
Thanks for reading!
You can find all the samples used in this article here.
ZITADEL is FREE! So, go on and try it out.